This is the multi-page printable view of this section. Click here to print.
How To
- 1: Compile an ML model
- 2: Generate an accelerator
- 3: Integrate the Tensil RTL
- 4: Run a compiled model
1 - Compile an ML model
Things you’ll need
- your ML model. If you don’t have one handy, continue on to use one of the demo ones.
- an architecture file in
.tarchformat. If you don’t know what this is yet, continue on and we’ll supply one for you.
1. Convert your ML model to ONNX
The first thing you need to do is convert your ML model to the ONNX format. ONNX stands for Open Neural Network Exchange, and converting to ONNX is supported by all the major frameworks. Instructions for:
2. Run the Tensil compiler
First, ensure you have Tensil installed by pulling and running the Tensil Docker container:
$ docker pull tensilai/tensil:latest
$ docker run -v $(pwd):/work -w /work -it tensilai/tensil:latest bash
Then from the container shell, run:
$ tensil compile -a <tarch_file> -m <onnx_file> -o output_node -s true
To compile with an example model and architecture file, the command is
$ tensil compile -a /demo/arch/ultra96v2.tarch -m /demo/models/resnet20v2_cifar.onnx -o "Identity:0" -s true
You should see some output like this:
$ tensil compile -a /demo/arch/ultra96v2.tarch -m /demo/models/resnet20v2_cifar.onnx -o "Identity:0" -s true
NCHW[1,3,32,32]=NHWC[1,32,32,1]=1024*16
List(-1, 256)
----------------------------------------------------------------------------------------------
COMPILER SUMMARY
----------------------------------------------------------------------------------------------
Model:                                           resnet20v2_cifar_onnx_ultra96v2
Data type:                                       FP16BP8
Array size:                                      16
Consts memory size (vectors/scalars/bits):       2,097,152                       33,554,432 21
Vars memory size (vectors/scalars/bits):         2,097,152                       33,554,432 21
Local memory size (vectors/scalars/bits):        20,480                          327,680    15
Accumulator memory size (vectors/scalars/bits):  4,096                           65,536     12
Stride #0 size (bits):                           3
Stride #1 size (bits):                           3
Operand #0 size (bits):                          24
Operand #1 size (bits):                          24
Operand #2 size (bits):                          16
Instruction size (bytes):                        9
Consts memory maximum usage (vectors/scalars):   35,743                          571,888
Vars memory maximum usage (vectors/scalars):     13,312                          212,992
Consts memory aggregate usage (vectors/scalars): 35,743                          571,888
Vars memory aggregate usage (vectors/scalars):   46,097                          737,552
Number of layers:                                23
Total number of instructions:                    102,741
Compilation time (seconds):                      71.562
True consts scalar size:                         568,474
Consts utilization (%):                          97.210
True MACs (M):                                   61.476
MAC efficiency (%):                              0.000
----------------------------------------------------------------------------------------------
---------------------------------------------
ARTIFACTS
---------------------------------------------
Manifest:  /work/resnet20v2_cifar_onnx.tmodel
Constants: /work/resnet20v2_cifar_onnx.tdata
Program:   /work/resnet20v2_cifar_onnx.tprog
---------------------------------------------
Next Steps
Congrats! You’ve compiled your model and generated three important artifacts, a .tmodel, .tdata and .tprog. All three are needed to run your compiled model,
so keep them handy. Assuming you have an accelerator built, you’re now ready to run your model. If not, it’s time to generate an accelerator.
Troubleshooting
If you got an error or saw something you didn’t expect, please let us know! You can either join our Discord to ask a question, open an issue on Github or email us at [email protected].
Converting to ONNX didn’t work?
If you’re using Tensorflow and the ONNX converter failed, don’t despair! We also support compiling from a frozen graph in PB format. To freeze a Tensorflow model, use the freeze_graph tool located here in the Tensorflow repo.
If you have Tensorflow installed, you can use it in a script by doing
from tensorflow.python.tools.freeze_graph import freeze_graph

graph_def = "some_graph_def.pb"
ckpt = "model.ckpt-1234567"
output_graph = "frozen_graph.pb"
output_nodes = ["softmax"]
input_binary = graph_def.split(".")[-1] == "pb"

freeze_graph(
        graph_def,
        "",
        input_binary,
        ckpt,
        ",".join(outputs_nodes),
        "save/restore_all",
        "save/Const:0",
        output_graph,
        True,
        )
or you can use it directly from the command line by running
python -m tensorflow.python.tools.freeze_graph \
 --input_graph=some_graph_def.pb --input_binary \
 --input_checkpoint=model.ckpt-1234567 \
 --output_graph=frozen_graph.pb --output_node_names=softmax
2 - Generate an accelerator
Things you’ll need
- an architecture file in
.tarchformat. If you don’t know what this is yet, continue on and we’ll supply one for you. - an AXI data width in bits (check your FPGA product page)
1. Run the Tensil RTL generator
First, ensure you have Tensil installed by pulling and running the Tensil Docker container:
$ docker pull tensilai/tensil:latest
$ docker run -v $(pwd):/work -w /work -it tensilai/tensil:latest bash
Then from the container shell, run:
$ tensil rtl -a <tarch_file> -d <axi_port_width>
To compile with an example model and architecture file, the command is
$ tensil rtl -a /demo/arch/ultra96v2.tarch -d 128
You should see some output like this:
$ tensil rtl -a /demo/arch/ultra96v2.tarch -d 128
Elaborating design...
Done elaborating.
-------------------------------------------------------
ARTIFACTS
-------------------------------------------------------
Verilog bram_dp_256x4096:   /work/bram_dp_256x4096.v
Verilog bram_dp_256x20480:  /work/bram_dp_256x20480.v
Verilog top_ultra96v2:      /work/top_ultra96v2.v
Driver parameters C header: /work/architecture_params.h
-------------------------------------------------------
Next Steps
You’ve generated several RTL artifacts (the files ending in .v) - now it’s time to integrate them into your system.
Troubleshooting
I can’t figure out what AXI width to use
Here’s a table with some known values:
| FPGA Family | AXI Data Width | Tensil Flag |
|---|---|---|
| Zynq-7000 | 64 bit | -d 64 |
| Zynq Ultrascale+ | 128 bit | -d 128 |
If your FPGA family isn’t listed and you need help, ask a question on Discord or email us at [email protected].
3 - Integrate the Tensil RTL
Things you’ll need
- an FPGA board (e.g. the Ultra96-V2)
- an EDA tool that can target your FPGA (e.g. if you purchased an Ultra96-V2, it should have come with a free license to Xilinx Vivado)
- the set of RTL (
*.v) files that were emitted by the RTL generator. If you don’t have those, see how to generate RTL
This guide will assume you are using the Xilinx Vivado block design interface, but the methodology should be broadly the same for any EDA tool.
1. Instantiate the IP block
Create a new project, choose the appropriate board constraints file and add a block design. Instantiate the host processor: in the case of the Ultra96-V2, this will be the Zynq UltraScale+ processing system. Be sure to run any block automation required.
Move the generated RTL files into your project sources. In Vivado this can be achieved by hitting Add sources and selecting the files. Make sure to add all generated files. If you generated them using the guide, the files will be called top_ultra96v2.v, bram_dp_256x20480.v and bram_dp_256x4096.v.
Then, drag and drop the Top block (named top_<arch>.v, e.g. top_ultra96v2.v) into the block design. We’ll refer to this block as the top block from here on.
2. Connect the AXI interfaces
There are three AXI interfaces needed for basic operation, one for receiving instructions and two for interacting with host memory.
The instruction interface is an AXI stream slave that needs to be driven by the host processor. The easiest way to achieve this is to instantiate an AXI DMA block with one write port. Connect the AXI stream master (M_AXIS_MM2S) to the instruction interface on the top block. You may need to use an AXI data width converter to ensure the widths match.
Next, connect the memory interfaces. The host processor should have AXI slave ports that provide access to host memory, although these may need to be enabled in the configuration settings. For Ultra96-V2, go to the PL Interfaces section and enable S_AXI_HP0_FPD and S_AXI_HP2_FPD. On the top block, connect m_axi_dram0 -> S_AXI_HP0_FPD and connect m_axi_dram1 -> S_AXI_HP2_FPD.
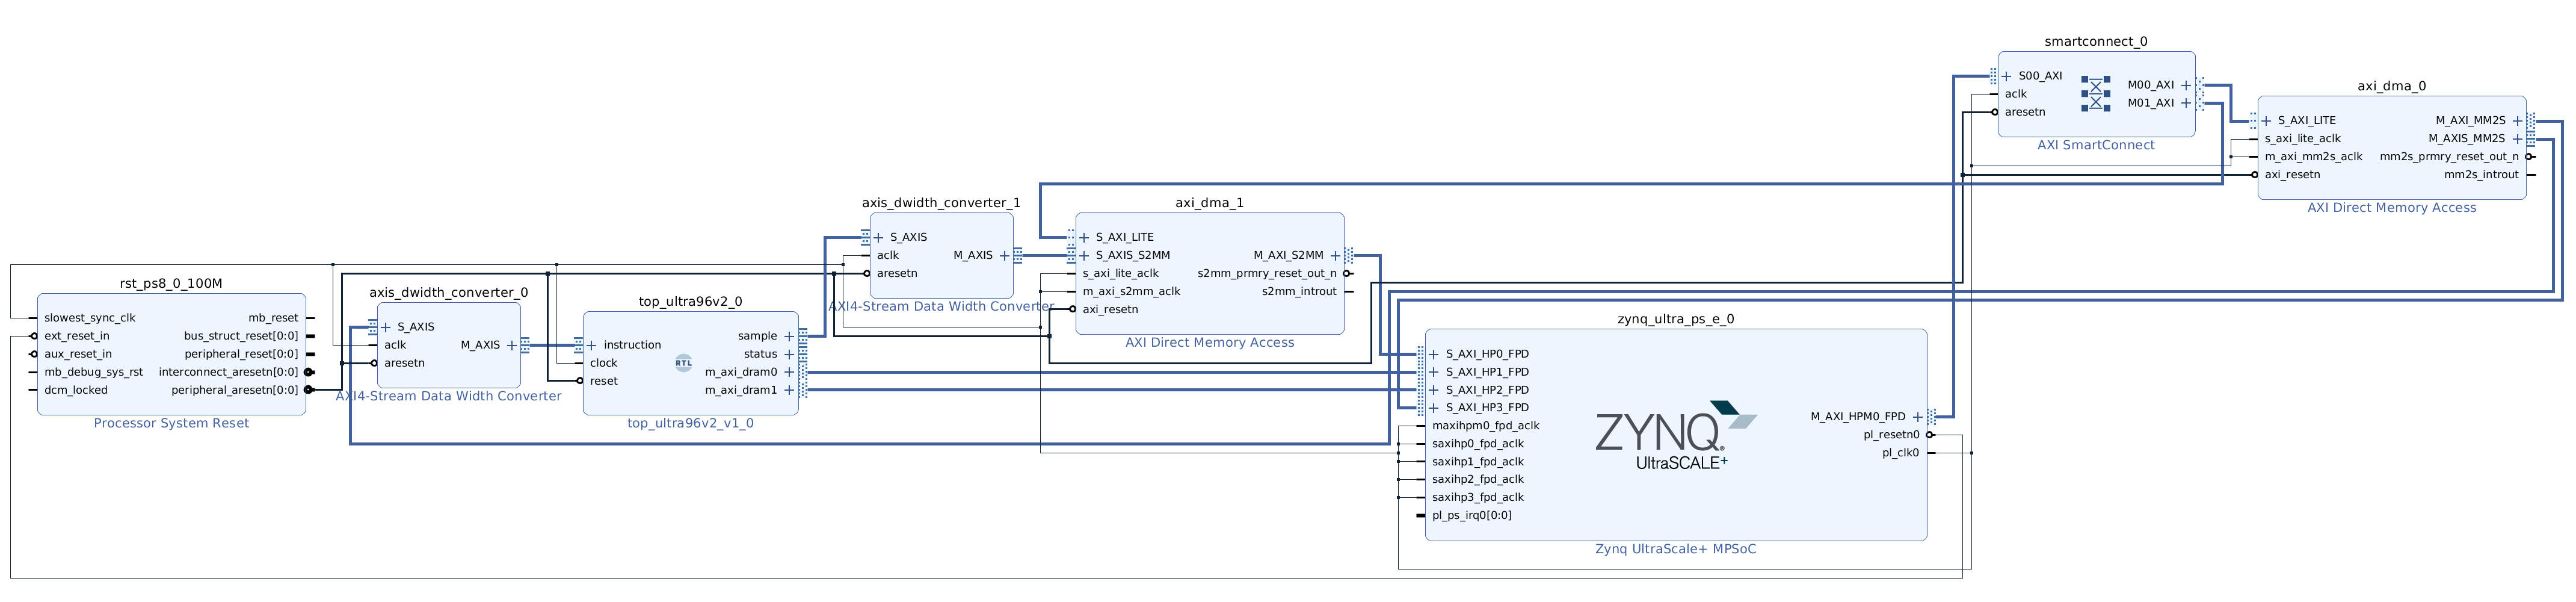
3. Generate bitstream
The block design should now be complete. See below for an example of what a complete design looks like (you can ignore the sample and status interfaces: they are for performance testing and debugging respectively).
Save your design and then create a HDL wrapper if necessary. Finally, start the implementation by hitting “Generate bitstream”. This may take around 10 minutes. If all goes well, you should end up with a .bit file, which is the bitstream itself, and possibly a hardware hand-off file with an extension like .hwh. For Vivado, bitstream can be found at <project_name>.runs/impl_1/design_1_wrapper.bit and the hardware handoff file can be found at <project_name>.srcs/sources_1/bd/design_1/hw_handoff/design_1.hwh.
Next Steps
Now that you have a hardware implementation, you are ready to run your compiled ML model.
Troubleshooting
How to integrate the RTL block will vary from system to system, and there are many quirks and gotchas that could get in the way. If you get stuck, don’t despair! We’re here to help: ask a question on Discord or email us at [email protected].
4 - Run a compiled model
Things you’ll need
- an FPGA board (e.g. the Ultra96-V2)
- a compiled model (e.g. the set of three files:
resnet20v2_cifar_onnx.tmodel,resnet20v2_cifar_onnx.tdata,resnet20v2_cifar_onnx.tprog) - a fully implemented bitstream (
.bit) and a hardware handoff file (.hwh): if you don’t have these, learn how to integrate the RTL
In this guide we’ll assume you are using the PYNQ execution environment, but we also support bare metal execution with our embedded C driver.
1. Move files onto the FPGA
With PYNQ, you can achieve this by running
$ scp <my_model>.t* [email protected]:~/
and then doing the same for the .bit and .hwh files. For example:
$ scp resnet20v2_cifar_onnx.t* [email protected]:~/
$ scp design_1_wrapper.bit [email protected]:~/ultra96-tcu.bit
$ scp design_1.hwh [email protected]:~/ultra96-tcu.hwh
Note that with PYNQ, the .bit and .hwh files must have the same name up to the extension.
2. Copy the Python driver onto the FPGA
If you haven’t already cloned the repository, get the Tensil source code from Github, e.g.
curl -L https://github.com/tensil-ai/tensil/archive/refs/tags/v1.0.0.tar.gz | tar xvz
Now copy the Python driver over:
$ scp -r tensil-1.0.0/drivers/tcu_pynq [email protected]:~/
3. Execute
Now it’s time to hand everything over to the driver and tell it to execute the model. This guide will only cover the bare necessities for doing so, go here for a more complete example.
Import the Tensil driver
from pynq import Overlay
import sys
sys.path.append('/home/xilinx')
from tcu_pynq.driver import Driver
from tcu_pynq.architecture import ultra96
Flash the bitstream onto the FPGA
bitstream = '/home/xilinx/ultra96-tcu.bit'
overlay = Overlay(bitstream)
tcu = Driver(ultra96, overlay.axi_dma_0)
Load the compiled model
resnet = '/home/xilinx/resnet20v2_cifar_onnx_ultra96v2.tmodel'
tcu.load_model(resnet)
Run
Pass your input data to the driver in the form of a dictionary. You can see which inputs the driver expects by printing tcu.model.inputs.
img = ...
inputs = {'x:0': img}
outputs = tcu.run(inputs)
If all went well, outputs should contain the results of running your model.
Next Steps
You’ve successfully run your compiled model on Tensil’s accelerator implemented on your FPGA. You’re ready to use this capability in your application. Reach out to us if you need help taking it from here.
Troubleshooting
As always, if you run into trouble please ask a question on Discord or email us at [email protected].